Introduction
In this blog post I will teach you how you can build your first application with blob storage and C#. The tools that you need to get started are described in the previous
blog post. In this blog post I will first repeat the use case and next I will start building the use case step by step. Good luck with the different exercises and if you get stuck, please leave a comment below.
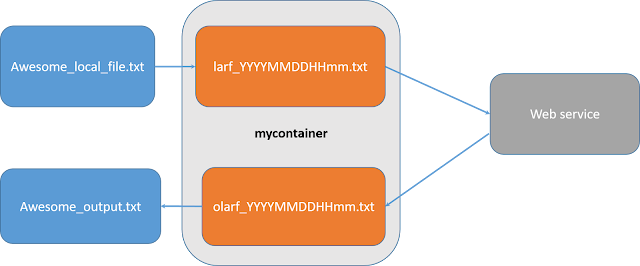
We are building the application that is shown in the picture below. We have locally on our computer the file C:\test_files\Awesome_local_file.txt. We have a web service in the cloud that performs a special operation on this file that we can't perform on our file locally. Therefore we will need to upload the Awesome_local_file.txt to my_container as the blob larf_YYYYMMDDHHmm.txt. In this way the Web service will be able to access the file and perform his operation on it. The web service will provide as output the olarf_YYYYMMDDHHmm.txt file which it will store in the container mycontainer. Afterwards you will be able to download this file back to your computer as Awesome_output.txt.
The structure of the exercises.
You can find
here the overview of all the exercises, so that you can each time copy/paste what you need when you are making the exercises.
Build the Visual Studio Project as described in the
previous blog and make sure that you have started the Microsoft Azure Storage Emulator. Change your
Main function in the
Program.cs file so that it looks like the code below. When you are working on an exercise, you need to delete the
// from the fourth line and adjust the number from the exercise that you are working on and next you can execute your exercise.
The following libraries will be used during the exercises. Make sure to add them in the beginning of the file Program.cs.
Press Start from the toolbar and a Console window will appear, hit two times Enter and your Console Window will close again.
Make a folder on your C drive that is called test_files. Make in this folder a text file that you give the name Awesome_local_file.txt. In what follows we will teach you the code how you can copy this file to blob storage, so that a potential web service in the cloud can use this.
Exercise_0
Before we can upload Awesome_local_file.txt to the cloud, we need to be able to connect to our blob storage account and create a container in the cloud, the equivalent of a directory on your computer. We can achieve this by using the code of Exercise_0 below. Add this function to the Program.cs file and make sure that you have uncommented Exercise_0 in the Main file. Run your program.
When you have executed your program. The container mycontainer has been created and this looks schematically like the following picture.
If you want to check whether mycontainer has been created successfully, you can open the Microsoft Azure Storage Explorer that we have installed in the previous blog. You will see that the container mycontainer is now part of your Blob Containers in the (Development) Storage Account.
Exercise_1 Send Awesome_local_file.txt to the cloud
We will now copy Awesome_local_file.txt to the cloud. Because the name of this file might not be that unique in the cloud, we are adding in a unique identifier to this file in the cloud and we will call the file in the cloud larf_YYYYMMDDHHmm.txt for which we will derive YYYYMMDDHHmm from the current date and time.
When we have generated the file name, we will upload Awesome_local_file.txt to the cloud. At the end of the function we will return the name of the newly generated file so that we can use this function in the next exercises.
Make sure to change in the Main function the fourth line to Exercise_1 and run the program.
We have schematically achieved the following result. In the next exercise we will list all the different files that are available in mycontainer using code.
If you can't wait till the end of Exercise_2 to see whether your exercise was successful, you can also use the Microsoft Azure Storage Explore. Make sure that you hit the refresh icon and when you click on mycontainer, you will see the larf_YYYYMMDDHHmm.txt that you have just created.
Exercise_2 Getting a listing from the files in mycontainer
Now we will learn how you can get the list of all the files in mycontainer using code. First you will need to connect to your storage account and ask for a reference to mycontainer. We will get all the different blob items in the container and will print the information of the CloudBlockBlobs, this is the way that a text file is stored in Azure Blob storage.
Change in the main function Exercise_1 to Exercise_2 and run the program. You will see something similar as below in your console window.
As you may notice from the console window, the (Development) storage account is also called the devstoreaccount1. When you look back at the Microsoft Azure Storage Explorer, you also will see the devstoreaccount1.
As an extra exercise, you can also add in the sequence of Exericse_2, Exercise_1 and Exercise_2 in the main file and you can see that Exercise_1 has added in an extra file in mycontainer.
Exercise_3 Mimic the web service and download the result
Because we have now a copy of Awesome_local_file.txt in the cloud, the Web service will be able to reach it. We will reuse Exercise_1 for this. The Web service will perform some awesome manipulation on this file and will return the result as olarf_YYYYMMDDHHmm.txt. We will mimic this by making a copy of our file in the cloud. Finally we want to have a copy of the result locally and we will therefore download this file to a local file AwesomeOutput.txt in the test_files directory.
Make sure again that you are referencing Exercise_3 in the main function and run your program. Go to your test_files directory and you should have now the AwesomeOutput.txt file.
Exercise_4 Make sure to have a nice clean up routine
Use your preference to check which files are available in mycontainer. You will see that for each time that you are executing Exercise_1 or Exercise_3, you will be generating extra files in the cloud. When you are using the cloud, you should make sure that you are nicely cleaning up your unneeded files because you are paying for these unneeded files. Therefore we will be adding in code now to remove the two cloud files that are generated when you are executing the use case.
Execute the following sequence Exercise_2, Exercise_4, Exercise_2 in your main file. You will now see that no extra file has been generated. Similar to the schematic view below.
Exercise_5 Clean up everything what was left from the initial exercises
When we are now executing our use case, we are not leaving any files behind in the cloud. Great. But what happens with the old files that we have generated and what happens with mycontainer when we eventually don't need it any more? Therefore we have a final clean up routine. We now will be removing all the extra files in mycontainer and finally will also remove the container.
Execute Exercise_5 in your main file. You can next go to the Microsoft Azure Storage Explorer and when you refresh, you will see that mycontainer doesn't exist any more. Schematically this will look as below.
Conclusion
Congratulations if you have reached this part of my blog, that means that you have gained some extra knowledge about blob storage. You can find the code also on my
github account. In a next blog I will explain how a web service generated from Azure Machine Learning Studio can use these files from blob storage.