In this blog post I will describe a method that you can use to import a local csv-file to the cloud in Azure SQL Server without writing any code. Although you can also do this with SQL Server Management Studio (SSMS), this is not always an easy option for example if you don't have SQL Server Management Studio available because you are working on a Mac or a Linux computer. Another reason might be that you are working from another location than usual and your IP hasn't been granted permission to access the Azure SQL Server database.

In the rest of this post, I will explain how you can execute this trick yourself. The most important things that you will need are a csv file, Azure Machine Learning Studio and a subscription to Azure. If you have already deployed an Azure SQL Database in the cloud, you can fast forward to forward to Preparing Azure Machine Learning Studio.
Make a SQL Database in the Azure Portal

We first make a database from the Azure Portal. We are going to use this database to build a prototype and the main functionality that we need is to access the database, to perform an INSERT and a SELECT statement. Therefore, we will generate the least expensive database.
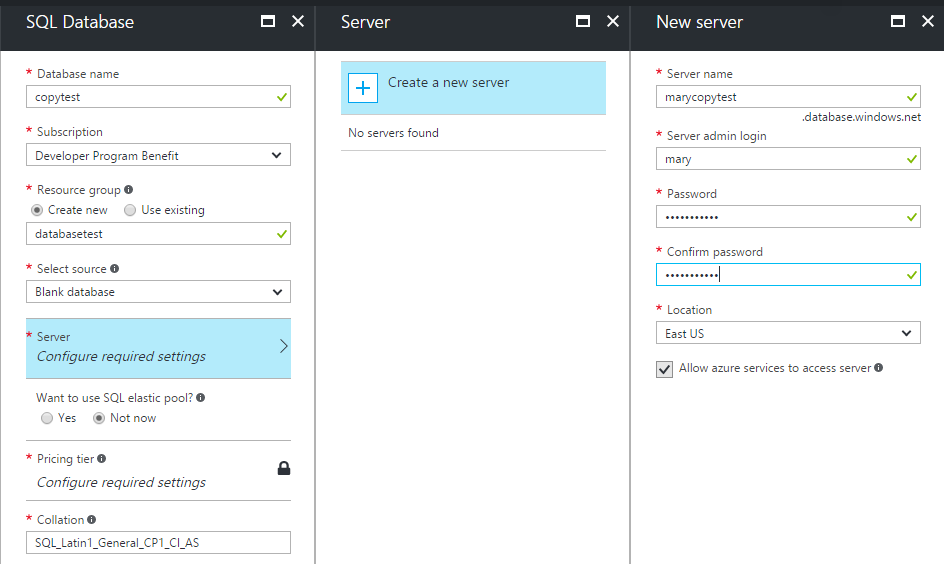
We login to the Azure Portal and we select SQL databases from the left column in the portal. This brings us to the configuration screen as we can see below and we make the choices to define the name of the database and define a server where the database will live.
Next we will need to make a choice about the cost of the database. You can make a choice between Basic, Standard, Premium and PremiumRS. You can select both the Database Transaction Units (DTU) which determine the computational speed and the storage which determines the space that your database will use. For this experiment we will work with the Basic option and we select the lowest DTU and we will keep the suggested storage space. The cost of this database is 6.07 CAD a month.

When you have put in all these configurations it is a good idea to select the Pin to Dashboard checkbox. This allows you to easily monitor the progress of the deployment of a resource or another action that you initiated in Azure. Just wait a few minutes and your database will be deployed to Azure.

Preparing Azure Machine Learning Studio
Uploading your local file to the cloud as a dataset
First, you will need to login to Azure Machine Learning Studio. In case you haven't used this before you can use the same Microsoft account that you use for your Azure account. If you select the Free Workspace, there will be no extra charges involved for using Azure Machine Learning Studio.

First you want to make a dataset in Azure Machine Learning Studio from your csv-file. This will mean that your dataset will be stored in your datadrive that belongs to your Azure Machine Learning account Studio. Therefore, select DATASETS in the left column. Next you can make a new dataset by selecting the + NEW button on the bottom of the page. After you have clicked this button, you will be able to upload your csv-file to the cloud.

Building the Experiment that uploads the csv file to the database
Now, let's switch in Azure Machine Learning Studio to Experiments in the left column and create a new Experiment by clicking on the + NEW button on the bottom of the screen. In the wizard that follows, you can select "Blank experiment".

You can drag over your csv-file to the middle of the page. If you right click on the circled 1 you can select Visualize.

We now see an overview of the dataset and we can visually inspect whether the data has been imported correctly.

Now we will add in a Column Selector that will select all the columns that we want to transfer to the database.

Finally we will select an Export Data box and our experiment will look as below.

To make the red exclamation mark disappear you will need to provide the information of your database. With Data table name you can name the resulting table name in the database, in case this table is not available yet it will be automatically generated.

When the red exclamation mark has disappeared, you can run the experiment by selecting the RUN button in Azure Machine Learning Studio. In case you run into errors, make sure to check whether your have written down the column names correctly or whether you have made some typos in your password.
Validation that the data has arrived in your database
Create now a new experiment and drag an import button to this experiment and configure this again that you will be able to access your Azure SQL Database. Type a simple select statement as your database query.

Press the RUN button again and select next Visualize from he Circled 1. You will see that you now can retrieve the information from your csv-file from the database.

Conclusion
Today, we discussed today a strategy to upload a local csv-file into a table in Azure SQL Server with an uncommon use of Azure Machine Learning Studio. For another Azure Machine Learning Studio hack see
- How to extract images that are generated by Azure Machine Learning Studio
- How to call a web service generated from Azure Machine Learning Studio from Ruby.